What is a desktop shortcut?
A desktop shortcut, usually represented by an icon, is a small file that points to a program, folder, document, or Internet location. Clicking on a shortcut icon takes you directly to the object to which the shortcut points. Shortcut icons contain a small arrow in their lower-left corner. Shortcuts are merely pointers; deleting a shortcut does not delete the item to which the shortcut points.
How do I create a desktop shortcut?
If the item is located on the Start menu:
- Click Start. The Start menu appears.
- Locate the item to which you want to create a shortcut. If the item is located on a submenu, go to the submenu.
- Right-click the item. A context menu appears.
- Click Send To. A submenu appears.
- Click Desktop (Create Shortcut). Vista creates a shortcut to the item.
If the item is visible in the Windows Explorer:
- Open Windows Explorer.
- Locate the item for which you want to create a shortcut.
- Right-click the item. A context menu appears.
- Click Send To. A submenu appears.
- Click Desktop (Create Shortcut). Vista creates a shortcut to the item.
How do I create a desktop shortcut to a Web page?

If youare using Internet explorer:
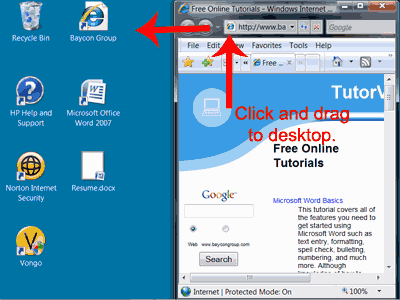
- Click the icon that precedes the URL on the address bar.
- Drag the icon to your desk top. Vista creates the shortcut.
Now, when you click on the shortcut, the Web page will open.
How do I turn a Web link into a desktop shortcut?

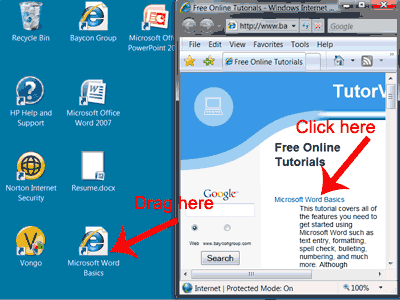
- Click the link in your browser window (usually underlined text) and drag it to the desktop. An icon appears on your desktop.
- Click the icon to go directly to the link’s destination. If your browser is not open, clicking the icon starts the browser.
How does the Create Shortcut Wizard work?
You can use the Create Shortcut Wizard to add a shortcut to your desktop.
- Right-click the desktop. A context menu appears.
- Click New. A submenu appears.
- Click Shortcut. The Create Shortcut dialog box appears.
- Type in the location of the item to which you want to create a shortcut. Alternatively, browse to find the item.
- Click Next. The next Create Shortcut dialog box appears.
- Accept the default name or type in a new name.
- Click Finish. Vista creates the shortcut.
How do I rename a desktop shortcut?
The name of the desktop shortcut displays below its icon. For example, if you create a shortcut to the program Microsoft Word, the name Microsoft Word displays below the icon. To rename a shortcut:
- Right-click the shortcut. A context menu appears.
- Click Rename.
- Type a new name.
- Press Enter. Vista renames the icon.
I have a shortcut that opens a program on my desktop. How do I add it to the Start menu?
- Right-click the shortcut icon. A menu appears.
- Click Pin To Start menu. The program appears on the Start menu, above the horizontal line.
How do I change the icon associated with an object on the desktop?
- Right-click the icon. The context menu appears.
- Click Properties. The Properties dialog box appears.
- Click the Change Icon button. The Change Icon dialog box appears.
- Click the icon of your choice.
- Click OK. The Change Icon dialog box closes.
- Click Apply.
- Click OK. Vista closes the Properties dialog box. Vista changes the icon.
Note: Not all icons can be changed. If you do not see the Change Icon button or if the change icon button is dimmed, the icon cannot be changed.
How do I delete a desktop shortcut?
- Click the shortcut.
- Press the Delete key. Vista asks if you are sure you want to delete the shortcut.
- Click Yes.
Remember, shortcuts have an arrow in the lower-left corner. If the icon you delete does not have an arrow in the lower-left corner, it is not a shortcut and deleting the icon deletes the object.
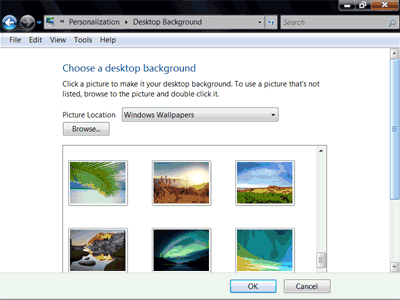
Wallpaper is the background that displays on your desktop.

- Click the Start button.
- Click Control Panel, which is located on the right side of the Start menu. The Control panel appears.
- Click Change the Desktop Background. It is listed under Appearance and Personalization.
- Select the wallpaper you want from the ones that appear or click the down-arrow in the picture location field to select another wallpaper category. Note: If you would like to display an image you created, you can click Browse to find the image.
- Click to select how you want your image to appear on the screen. Choose from the following:

|
Option |
Explanation |
|
Center
|
Place the image in the center of the screen. |
|
Tile
|
Have the image display as tiles across and down the screen. |
|
Stretch
|
Stretch the image so the image covers the entire screen. |
A font is a set of characters represented in a single typeface. Each character within a font is created by using the same basic style.
Fonts are measured in points. There are 72 points to an inch. The number of points assigned to a font is based on the distance from the top to the bottom of its longest character.
You must purchase or otherwise obtain the font you want to install. Then:
- Click the Start button.
- Click Control Panel.
- Click Appearance and Personalization.
- Click Install or Remove a Font, which is located under Fonts. The Fonts window appears.
- Click File, which is located on the menu bar of the Fonts window. Press the Alt key if you do not see the menu bar.
- Click Install New Font.
- Specify the drive and folder where the font you want to install is currently located. The fonts appear in the List of Fonts box.
- Highlight the font you want to install.
- Select Copy Fonts To Fonts Folder (this puts a copy of the font you are installing in the Fonts folder).
- Click Install. If you are prompted for permission to continue, click Continue. Vista installs the font.
- Click Close. The Add Fonts dialog box closes.
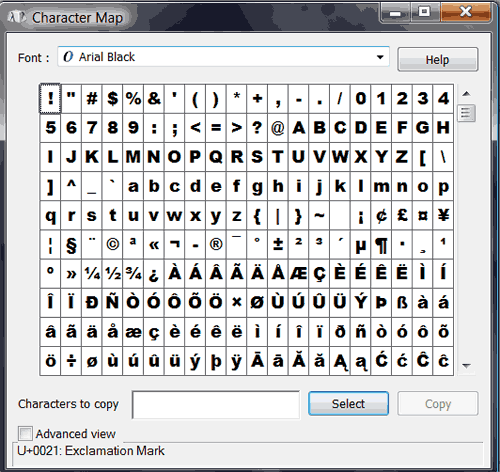
The Character Map displays the characters available in a selected font. To view the Character Map dialog box:
- Click the Start button.
- Click All Programs. The All Programs menu appears.
- Click Accessories. A submenu appears.
- Click System Tools. A submenu appears.
- Click Character Map.
The dialog box shown here appears.

- Select a font from the Font field drop-down menu. The characters of the font appear in the boxes in the center of the window.
- Click a character box to display an enlarged version of the character.
- Double-click a character to send the character to the Characters To Copy field.
- Click Copy. Vista places the character on the Clipboard. You can paste it into other programs.
Note: You can send multiple characters to the Characters to Copy field. Click the Copy button to move the Characters To Copy field contents to the Clipboard.
Thanks to baycongroup.com for providing this article


